
Đánh giá công nghệ: DaVinci Resolve 19, ZBrush cho iPad, Nuke 15.1v2
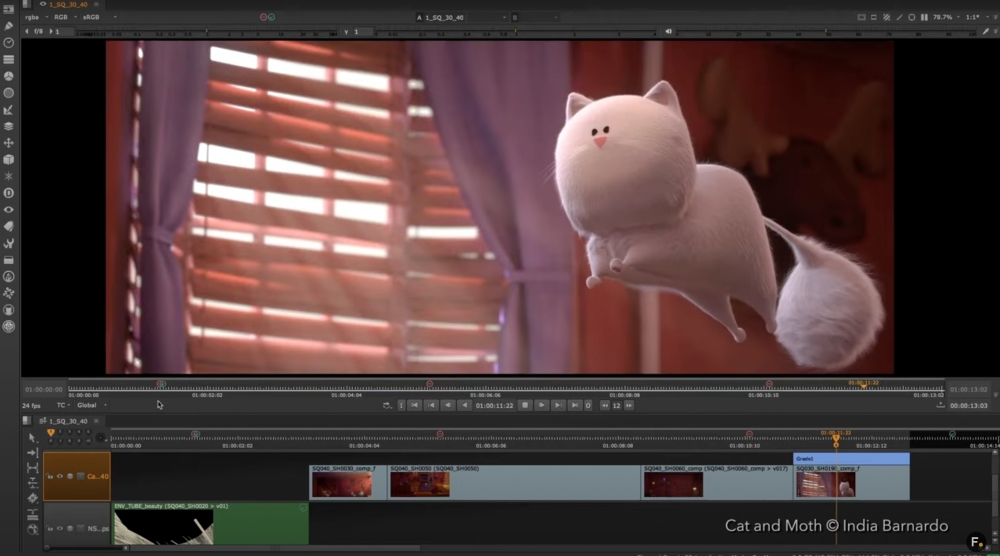
Sau một giai đoạn beta kéo dài (so với các phiên bản trước đó), Blackmagic cuối cùng đã phát hành Resolve 19, và như thường lệ, tôi không có đủ chỗ ở đây để nói về tất cả gần 100 tính năng mới mà nó cung cấp. Có nhiều tiến bộ trong Cloud Collaboration, Cut và Edit, Color, Fusion và Fairlight. Tôi nghĩ rằng tôi sẽ giữ nó cho chúng ta, những người thường xuyên với máy tính cá nhân chúng ta ở phòng khách — thay vì những cơ sở lớn với nhiều biên tập viên làm việc trên khắp thế giới trên cùng một dự án, hoặc các studio phát sóng đang thực hiện các sự kiện thể thao trực tiếp — không phải là không có các công cụ quan trọng cho những anh chàng đó!
Ở các chế độ Cut và Edit, chúng ta có tính năng chuyển lời nói thành văn bản, giúp tạo ra văn bản có thể chỉnh sửa từ các đoạn phim chứa lời thoại trong thùng phương tiện của bạn. Dựa vào thông tin đó, bạn có thể chỉnh sửa các đoạn phim dựa trên văn bản được chuyển sang… trong timeline. Nói về văn bản, bạn cũng có thể tự động tạo ra phụ đề vào track phụ đề trên timeline. Các tiêu đề xuất hiện dưới dạng các đoạn phim trong timeline, bạn có thể bấm chuột vào và chỉnh sửa. Hơn nữa, trên timeline Cut, bạn có thể chạy Scene Cut Detection, sẽ xác định những thay đổi cảnh trong cảnh quay và cắt đoạn phim dựa trên chúng. OpenTimelineIO hiện đã được hỗ trợ như một định dạng timeline có thể nhập/xuất (xem lại Nuke 15.1v2 để biết cách chúng hoạt động cùng nhau). Và, như thể không đủ, có một công cụ cô lập giọng nói dựa trên trí tuệ nhân tạo và một Dialogue Leveler. (Tôi nghi ngờ rằng các công cụ này có thể cũng có ở Fairlight.)
Ở phía Color Mode: Bên cạnh nhiều công cụ AI khác, Resolve có bảng điều khiển UltraNR Noise Reduction với điều khiển cá nhân cho tiếng ồn không gian và tiếng ồn thời gian. Film Look Creator giới thiệu lớp film, halo, weave, flicker, vignetting, v.v. Tôi chưa thực sự khám phá sâu như tôi đã làm với Dehancer, nhưng đó chắc chắn là mạnh mẽ. Họ đã chuyển Composite Modes để nằm bên trong nút màu thông qua việc kích chuột phải. Đối với tôi, đây thật sự là tiện lợi vì tôi thích so sánh phiên bản thông qua một nút khác biệt – và trước đây tôi phải chuyển đổi giữa Edit và Color liên tục. Fusion, công cụ compositing mà thiết thực bị đánh giá thấp trong Resolve, đã nhận được một số sự yêu quý thông qua một số nút thực sự phức tạp. Có hỗ trợ cho VDB files để kết xuất hiệu ứng hình thể như mây và các vụ nổ! Công cụ Multipoly Tool mang tất cả các hình dạng roto của bạn vào một danh sách có thể kiểm soát (không nói dối, điều này có lẽ nên đến sớm hơn). Có hỗ trợ USD — vì Fusion có một hệ thống 3D đầy đủ, thật sự đúng lý là bạn có thể đưa vào các sân khấu USD để kết xuất trong Fusion thông qua những render giả lập Hydra, hoặc nếu bạn chỉ cần một số thông số AOV thêm không cần phải quay lại vào DCC 3D hoặc yêu cầu nó từ bộ nhẹ. Cuối cùng, trong Fusion, có một công cụ Multi-Merge AOV sẽ chấp nhận nhiều đầu vào vào một hệ thống lớp — giống như một hệ thống compositing node/lớp kết hợp. Chúng ta cũng có một loạt các công cụ AI được kích hoạt bởi DaVinci Neural Engine: Person Masking, SuperScaling, Smart Refaming (cho các nền tảng truyền thông xã hội), NPR Stylizing, Face Refinement (!), Dead Pixel Fixing, Object Removal và Patch Replacing. Cuối cùng nhưng không kém phần quan trọng, chúng ta có Intellitracker để theo dõi và ổn định, có thể cũng được sử dụng để theo dõi nhân vật hoặc đối tượng sau đó điều khiển âm thanh trong Fairlight để kiểm soát chuyển vị âm thanh. Wow! Có quá nhiều tính năng mới, giá cả cũng tốt!
Website: blackmagicdesign.com/products/davinciresolve Giá: $219
ZBrush cho iPad
Sau hai năm phát triển, ZBrush đã được chuyển sang iPad. Có lẽ thời gian đó dành để xây dựng lại ZBrush từ đầu, đồng thời đánh giá những gì có thể làm cho nó tốt hơn trong tổng thể, không chỉ trên iPad. Có lẽ công nghệ phần cứng cần một khoảng thời gian để trưởng thành với các chip M2 và M4 để xử lý những gì ZBrush cần phải làm. Bất kể nguyên nhân là gì, công cụ mới đã được phát hành vào thời điểm này. Tôi cảm thấy người dùng sẽ thích nó… và tôi nói điều đó vì phản hồi beta là tích cực, và bất kỳ tính năng mới nào cũng sẽ được di chuyển vào phiên bản tiếp theo của phiên bản desktop. Người dùng ZBrush sẽ rất vui khi biết rằng nhiều tính năng trên desktop được tìm thấy trong phiên bản di động. Có hàng trăm bàn chải điêu khắc tích hợp cũng như khả năng nhập các bàn chải do người dùng tạo ra. Sự tiện lợi này cũng đúng cho ZTools và ZProjects – cả hai đều có thể thay thế giữa các phiên bản iPad và desktop. Giao diện đã được cấu hình lại cho thiết bị, vì vậy có một số thời gian tìm kiếm ban đầu cho các công cụ yêu thích của bạn. Nhưng hãy yên tâm rằng hầu hết mọi thứ đều ở đó (các công cụ không có trong bản phát hành ban đầu đang chắc chắn đang được làm việc). Bạn phải đổi não một chút vì thay vì các phím tiền tố, bạn có một đĩa trên màn hình với các nút tuỳ chỉnh – và điều quan trọng hơn, nó có thể kéo quanh màn hình để dễ tiếp cận bằng ngón tay dù bạn đang cầm iPad từ trên xuống dưới, hoặc nếu bạn là người phải hoặc trái. Các cú nhấp bút và cú nhấp bút Pro cũng có thể tuỳ chỉnh. Kết hợp với tương tác bằng nhiều ngón tay, những tính năng này tạo ra một trải nghiệm rất tự nhiên và trực quan. Các công cụ mạnh mẽ là một phần của ZBrush cho iPad: ZRemesher, Sculptris Pro, Dynamesh, Live Boolean, Array Meshes, Dynamics và PolyPaint. Tất cả đều có sẵn cho người nghệ sĩ, và mọi thứ vẫn cực kỳ phản ứng. iPad M2 xử lý mạng như 40 triệu polys, trong khi M4 có thể xử lý lên đến 92 triệu. Điều này thật sự đáng ngạc nhiên. Những người thử nghiệm beta đang thích sự tương tác và tính linh hoạt đến mức họ muốn có những tính năng tương tự được triển khai trong phiên bản desktop. Đối với người dùng mới và muốn thử sức trong điêu khắc số, Maxon đang cung cấp một phiên bản miễn phí của ZBrush cho iPad với 28 bàn so với phổ biến nhất và những phiên bản được giảm sức mạnh của Dynamesh, SculptrisPro, ZSpheres and ZRemesher. Đó là cơ hội tuyệt vời để học cơ bản. Khi bạn muốn mua, việc đăng ký là một phần của Maxon One, nhưng bạn cũng có thể mua đăng ký riêng cho cả iPad và desktop. Đây là kết quả của hàng nghìn giờ thời gian dành nhiệt tình từ những cá nhân đam mê và siêu thông minh dành cuối tuần và thời gian làm thêm, lấp đầy thùng với mồ hôi và nước mắt, để đảm bảo rằng họ đã làm đúng điều. Tôi rất vui khi báo cáo rằng họ đã đạt được mục tiêu của mình!
ZBrush cho iPad yêu cầu iPadOS 17 trở lên, và có sẵn trên các mô hình iPad có chip A12 Bionic trở lên.
Website: zbrushforipad.com
Giá: $33.25 mỗi tháng; $399 mỗi năm
Nuke
Nuke 15.1v2 Của Foundry
Chưa lâu kể từ lần cuối cùng tôi đánh giá Nuke, nhưng trong phiên bản 15.1v2 mới, có một số tính năng kỹ thuật quan trọng cần được đề cập. Như độc giả của chúng tôi biết, Nuke là hệ thống ghép hình ngành công nghiệp được Foundry mang lại và sinh ra như một công cụ biên tập in-house cho Digital Domain. Hãy cùng nhau xem qua những điều mới mẻ đang diễn ra trong bản phát hành điểm dày dặn mặc dù gồm Nuke, Nuke Studio và Hiero:
BlinkScript, framework giống C++ nội bộ của Nuke để chạy mã trên dữ liệu pixel, đã có một số thay đổi để làm cho nó trở nên dễ tiếp cận và hiệu quả hơn. Một số trong số đó được đạt thông qua tài liệu chi tiết và khả năng nhìn thấy dễ dàng cho các loại biến số và như vậy. Nhưng nút BlinkScript bây giờ cho phép bạn truyền vào bốn kênh dữ liệu từ một lớp kênh, làm cho nhiều chỗ cho các kênh như chuyển động và độ sâu được sửa đổi cũng như dữ liệu RGBA — điều này tối giản hóa điều đó sẽ là nhiều tập lệnh Blink. Thế Tự Động Sao Chép, là lõi của khả năng học của máy của Nuke, nhanh hơn, sử dụng huấn luyện đa dạng chính xác, điều này thích nghi độ chuẩn chính xác của mình ở các giai đoạn khác nhau của quy trình đào tạo. Và quy trình làm việc trở nên mạnh mẽ và tối ưu hơn, cung cấp các điều khiển để tạm dừng và tiếp tục huấn luyện, hoặc xóa một lần huấn luyện trước hoặc tạo ra nhận định — bên trong nút CopyCat, trong khi trước đây đó là một quá trình thủ công nhiều hơn. USD tích hợp tiếp tục phát triển với các công cụ diễn xuất sân khấu mới và tính năng tái định hình thời gian để kéo dài thời gian của các hiệu ứng 3D trong Nuke. Foundry đang theo kịp với phiên bản mới nhất của Pixar, nhưng nó cung cấp một biến số môi trường mới để dễ dàng chuyển đổi giữa các phiên bản trường hợp bạn đang làm việc…
#TechReviews #DaVinciResolve19 #ZBrush #iPad #Nuke15_1v2 #BlackmagicDesign #Foundry #VFX #Compositing #Sculpting #PostProduction #Editing #ColorGrading #IndustryInsights
Blackmagic Design’s DaVinci Resolve 19
After a protracted beta phase (compared to previous releases), Blackmagic finally released Resolve 19, and as usual, I don’t have space here to talk about all the nearly 100 new features it offers. There are multiple advances in Cloud Collaboration, Cut and Edit, Color, Fusion and Fairlight. I think I’m going to keep it to us mortals with our Resolve workstation in the living room — rather than the bigger facilities with multiple editors working around the world on the same project, or the broadcast studios doing live sporting events — not that there aren’t important tools for those guys too!
In the Cut and Edit modes, we have a Speech to Text Transcription feature, which will generate editable text from clips with dialogue in your media bin. In turn, with that information, you can edit your clips based on the transcribed text … in the timeline. And speaking of text, you can autogenerate subtitles into the subtitle track on the timeline. The titles appear as clips in the timeline, which you can click on and edit. Further, on the Cut timeline, you can run Scene Cut Detection, which will identify shot changes in the footage and cut up the clip based on them.
OpenTimelineIO is now supported as an importable/exportable timeline format (see the Nuke 15.1v2 review for how that works together). And, as if that weren’t enough, there is an AI-based voice isolation tool and a Dialogue Leveler. (I suspect these might be in Fairlight as well.)
On the Color Mode side: Along with many other AI tools, Resolve has the UltraNR Noise Reduction palette with individual controls for spatial noise and temporal noise. Film Look Creator introduces grain, halation, weave, flicker, vignetting, etc. I haven’t taken a deep dive like I did with Dehancer, but it’s definitely powerful. They have moved Composite Modes to be inside the color node via a RMB click. For me, this is really handy because I like to compare versions via a difference node — and before I would bounce back and forth between Edit and Color.
Fusion, the sorely underrated compositing tool within Resolve, has received some love in the form of some really sophisticated nodes. There is support for VDB files for rendering volumetric effects such as clouds and explosions! The Multipoly Tool brings all of your roto shapes into a controllable list (not gonna lie, this probably should have arrived much sooner). There is USD support — because Fusion does have a full 3D system, it absolutely makes sense that you can bring in USD stages for either rendering in Fusion through Hydra-based renderers, or if you just need some extra AOV passes rather than going back into a 3D DCC or requesting it from the lighter. Lastly, in Fusion, there is a Multi-Merge Tool that will accept multiple inputs into a layer system — sort of like a hybrid node/layer compositing system.
We also get a slew of AI-driven tools fueled by the DaVinci Neural Engine: Person Masking, SuperScaling, Smart Refaming (for social media platforms), NPR Stylizing, Face Refinement (!), Dead Pixel Fixing, Object Removal and Patch Replacing. Last but not least, we have the Intellitracker for tracking and stabilizing, which can also be used to track characters or objects and then drive audio in Fairlight to control audio panning. Wow! There are so many new features, and the price is right too!
Website: blackmagicdesign.com/products/davinciresolve
Price: $219
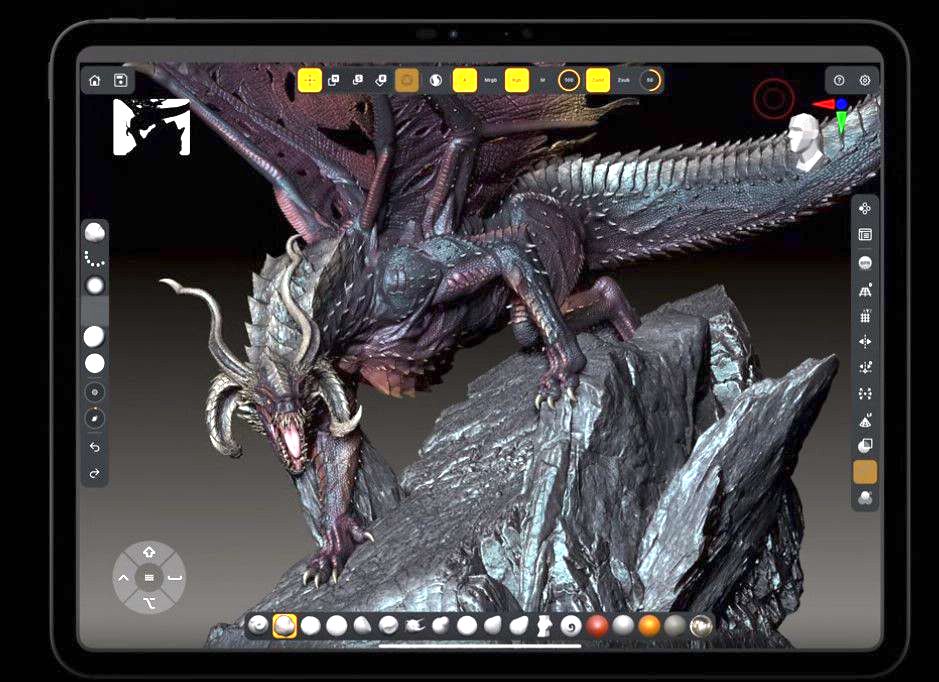
ZBrush for iPad
After two years in development, ZBrush has been ported over to the iPad. Perhaps that time was spent rebuilding ZBrush from the ground up, while assessing what could make it better as a whole, not just on the iPad. Perhaps the hardware technology needed some time to mature with the M2 and M4 chips to handle what ZBrush needs to do. Regardless, the new tool has been shipped at the time of this printing. I have a feeling users are going to love it … and I say that because beta feedback is positive, and any new functionality will end up migrating to the next release of the desktop version.
ZBrush users will be happy to know that many, if not most, of the desktop features are found in the mobile version. Hundreds of built-in sculpting brushes as well as the ability to import user-created brushes. This accessibility is also true for ZTools and ZProjects — both interchangeable between the iPad and desktop versions.
The interface has been reconfigured for the device, so there is some initial searching around for your favorite tools. But rest assured that most of everything is there (tools that aren’t in the initial release are definitely being worked on). You have to rewire your brain a little because instead of the modifier keys, you have a puck on screen with customizable buttons — and moreover, it can be dragged around the screen so that it’s thumb-accessible whether you are holding the iPad from the top or bottom, or if you are a righty or a lefty. The Pencil taps and Pencil Pro squeezes are also customizable. Combined with multi-finger touch interactions, these features make for a very natural and intuitive experience.
High-power tools are part of ZBrush for iPad: ZRemesher, Sculptris Pro, Dynamesh, Live Boolean, Array Meshes, Dynamics and PolyPaint. All of these are available to the artist, and things stay amazingly responsive. The M2 iPad handles meshes as dense as 40M polys, while the M4 can tackle up to 92M. It’s honestly remarkable.
The beta testers have been loving the interaction and customizability so much so that they are clamoring to have the same features implemented in the desktop version. For users who are new and want to dip their toe into digital sculpting, Maxon is offering a free version of ZBrush for iPad with 28 of the most popular brushes and ratcheted-down versions of Dynamesh, SculptrisPro, ZSpheres and ZRemesher. It’s a great opportunity to learn the basics. When you want to buy, the subscription is part of Maxon One, but you can also get its own subscription that covers a license for both the iPad and desktop.
This is the result of thousands of hours of dedicated time from passionate and super smart individuals spending weekends and overtime, filling buckets with sweat and tears, to make sure that they get this right. I’m happy to report that they’ve achieved their goals!
ZBrush for iPad requires iPadOS 17 or later, and is available on iPad models with A12 Bionic or later.
Website: zbrushforipad.com
Price: $33.25 per month; $399 per year
Foundry’s Nuke 15.1v2
It hasn’t been that long since my last review of Nuke, but in the new 15.1v2, there are some important technical features that need to be mentioned. As our readers know, Nuke is the industry go-to compositing system brought to us by Foundry and born as the in-house compositor for Digital Domain.
Let’s take a quick look at the new things going on in this deceptively thick point release, which includes Nuke, Nuke Studio and Hiero:
BlinkScript, Nuke’s internal C++-like framework to run code on pixel data, has some changes to make it more accessible and efficient. Some of these are achieved through more thorough documentation and visibility for variable types and such. But the BlinkScript node now allows you to pass in four channels of data from a channel layer, which makes more room for channels such as motion and depth to be modified as well as the RGBA data — which streamlines what would be multiple Blink scripts down to one.
The CopyCat node, which is the core of Nuke’s machine-learning capability, is faster, using mixed precision training, which dynamically adapts its precision at different stages of its training process. And the workflow is more robust and optimized, providing controls for pausing and resuming training, or deleting a previous training run or creating inferences — within the CopyCat node, where before it was a much more manual process.
USD integration continues to advance with new staging tools and time remapping features to retime 3D animations within Nuke. Foundry is keeping up with Pixar’s latest version, but it provides a new environment variable to easily swap between versions in case someone you are working with, or other software you are using, doesn’t use the same flavor of USD.
Foundry also continues pushing forward toward using Open tools to be a leader in trying to bring studios and DCCs together. Nuke Studio supports a full OpenTimelineIO round trip for moving editorial information between platforms. And OpenAssetIO, which allows Nuke to access published assets in a production-tracking system, has some further integration for retrieving frame ranges, color space properties and ingest types. It relies on the tracking system’s “entity reference” rather than an explicit file path — so if things change, the Nuke script won’t break because it can’t find the file.
Yet the thing that caught my eye is actually hidden in this latest build but can be revealed through an environment variable change: This is Multi-Shot Support. This function makes management of similar shots easier and more consistent. For example, you might have eight shots of a CU of Scarlett Johansson with a CG background. Usually, that would mean 8 Nuke scripts, nearly identical. But if you got a note that they want the BG more blue or CG changes, that means opening up eight Nuke scripts, making the change, rendering the change and ensuring that the same change happens in the same way to all the shots. In this new methodology, you have one script with all the similar shots, and via some control variables, you can have frame ranges or roto or tracking or whatever change through a switch node, and the switch and everything is determined by the specific shot number you are rendering — but the overall note is addressed in all of the shots. I guess it’s like a state change in 3D software.
I’ve used my time, and I’m being asked to leave the stage. Have a good night and tip your waitstaff!
[ad_2]
