Cách gắn nhãn khuôn mặt của người khác trong ứng dụng Photos của Apple trên iPhone, iPad và Mac. Xếp xếp ảnh của bạn có thể gây ra khó khăn. Khi bạn thêm quá nhiều ảnh, mọi thứ có thể trở nên khó khăn, làm phức tạp quá trình tìm kiếm hình ảnh phù hợp. May mắn thay, ứng dụng Photos có thể phát hiện khuôn mặt trong ảnh của bạn, cho phép bạn gắn nhãn và nhóm hình ảnh của những người trong ảnh. Dưới đây là cách gắn nhãn khuôn mặt của người trong ứng dụng Photos của Apple.
Cách gắn nhãn khuôn mặt của ai đó trong ứng dụng Photos
Sau khi bạn đã thêm hình ảnh vào thư viện ảnh của mình, iPhone hoặc Mac của bạn sẽ quét chúng để tìm khuôn mặt. Điều này được thực hiện trong thiết bị, vì vậy quyền riêng tư của bạn vẫn được bảo vệ. Đây là một trong những cách mà Mac bảo vệ quyền riêng tư của bạn. Nếu bạn sử dụng iCloud Photos, những nhãn này sẽ được đồng bộ trên tất cả các thiết bị Apple của bạn trong khi bảo vệ quyền riêng tư của bạn.
Gắn nhãn khuôn mặt trong ứng dụng Photos trên iPhone hoặc iPad
Để gắn nhãn cho một người trong một bức ảnh trên iPhone của bạn, đây là những gì bạn cần làm:
Di chuyển đến một bức ảnh chứa một người mà bạn muốn gắn nhãn.
Nhấn vào biểu tượng Info (i) ở phía dưới hoặc lướt lên trên ảnh. Nếu ứng dụng Photos đã xác định được một khuôn mặt, bạn sẽ thấy một biểu tượng hình tròn nhỏ có khuôn mặt ở góc dưới bên phải của hình ảnh. Một hình tròn màu xanh với một dấu hỏi bên trong có nghĩa là khuôn mặt chưa được gắn nhãn. Chạm vào nó.
Chọn Tên Người Này trong menu ngữ cảnh.
Trên màn hình tiếp theo, đặt tên cho họ và nhấn Tiếp theo.
Bây giờ, ảnh với nhãn của người này sẽ xuất hiện trong album của bạn. iPhone của bạn sẽ cố gắng tìm ra nhiều hình ảnh khác của người này và tự động gắn nhãn chúng dựa trên phân tích khuôn mặt.
Gắn nhãn khuôn mặt trong ứng dụng Photos trên Mac
Để gắn nhãn khuôn mặt của ai đó trong phiên bản macOS của ứng dụng Photos, làm theo các bước sau:
Mở một bức ảnh có khuôn mặt mà bạn muốn gắn nhãn trong ứng dụng Photos của Apple.
Nhấp vào nút Info (i) từ thanh công cụ ở góc phải trên cùng.
Một cửa sổ thông tin sẽ hiện lên với các chi tiết về bức ảnh. Bất kỳ khuôn mặt nào được tìm thấy trong ảnh sẽ được liệt kê dưới trường từ khóa.
Nhấp đúp vào khuôn mặt mà bạn muốn gắn nhãn.
Bây giờ, bạn sẽ thấy Thêm Tên ở góc trên bên trái. Bạn cũng có thể nhấp vào Xem trong thanh menu và chọn Hiển thị Tên Khuôn Mặt để lần sau bạn mở một bức ảnh, tất cả các khuôn mặt sẽ được gắn tròn.
Nếu bạn đã gắn nhãn cho các khuôn mặt, những khuôn mặt đó sẽ có tên dưới chúng. Nhấp vào ô bên dưới khuôn mặt được gắn tròn để thêm hoặc thay đổi tên. Nếu Mac của bạn không nhận ra một khuôn mặt trong một bức ảnh, bạn có thể mở bảng thông tin và nhấp vào nút cộng (+) trên nó. Một vòng tròn mới sẽ xuất hiện ở giữa ảnh. Bạn có thể kéo vòng tròn này quanh khuôn mặt mà bạn muốn và gắn nhãn nó.
Cách Tìm Ảnh qua Khuôn Mặt Được Gắn Nhãn trong Photos của Apple
Bây giờ bạn đã gắn nhãn cho một hoặc hai khuôn mặt, việc tìm ảnh của những khuôn mặt đó sẽ trở nên dễ dàng hơn nhiều. Tìm một bức ảnh cụ thể của ai đó sẽ trở nên dễ dàng hơn. Cách Tìm Ảnh Được Gắn Nhãn trên iPhone hoặc iPad Tất cả những khuôn mặt có nhãn được sắp xếp trong một album ảnh gọi là People. Bạn có thể tìm thấy tất cả các khuôn mặt bạn đã gắn nhãn và một số khuôn mặt mà thiết bị của bạn đã xác định để gắn nhãn. Chọn một album để xem tất cả các bức ảnh đã được gắn nhãn của một người cụ thể. Mặc định, ứng dụng Photos sẽ hiển thị cho bạn một bức ảnh tổng hợp của những hình ảnh của người đó, ẩn đi một số nếu chúng trông giống nhau. Nếu bạn muốn xem tất cả các bức ảnh của người đó đã được gắn nhãn cho đến nay, hãy chạm vào Hiện Thêm bên dưới ảnh được đánh dấu. Bạn cũng có thể xem các khuôn mặt khác mà iPhone của bạn nghĩ có thể là người được gắn nhãn trong album. Chạm vào biểu tượng chấm ba (…) ở góc trên bên phải và chọn Xác Nhận Các Ảnh Bổ Sung. iPhone của bạn sẽ hiển thị các bức ảnh mà nó nghĩ có thể là người bạn đã gắn nhãn. Xác nhận bằng cách chạm vào Có hoặc Không. Sau khi bạn đã gắn nhãn cho những người trong ảnh, họ cũng sẽ hiển thị khi bạn tìm kiếm tên của họ trong ứng dụng Photos hoặc tìm kiếm Spotlight trên iPhone của bạn.
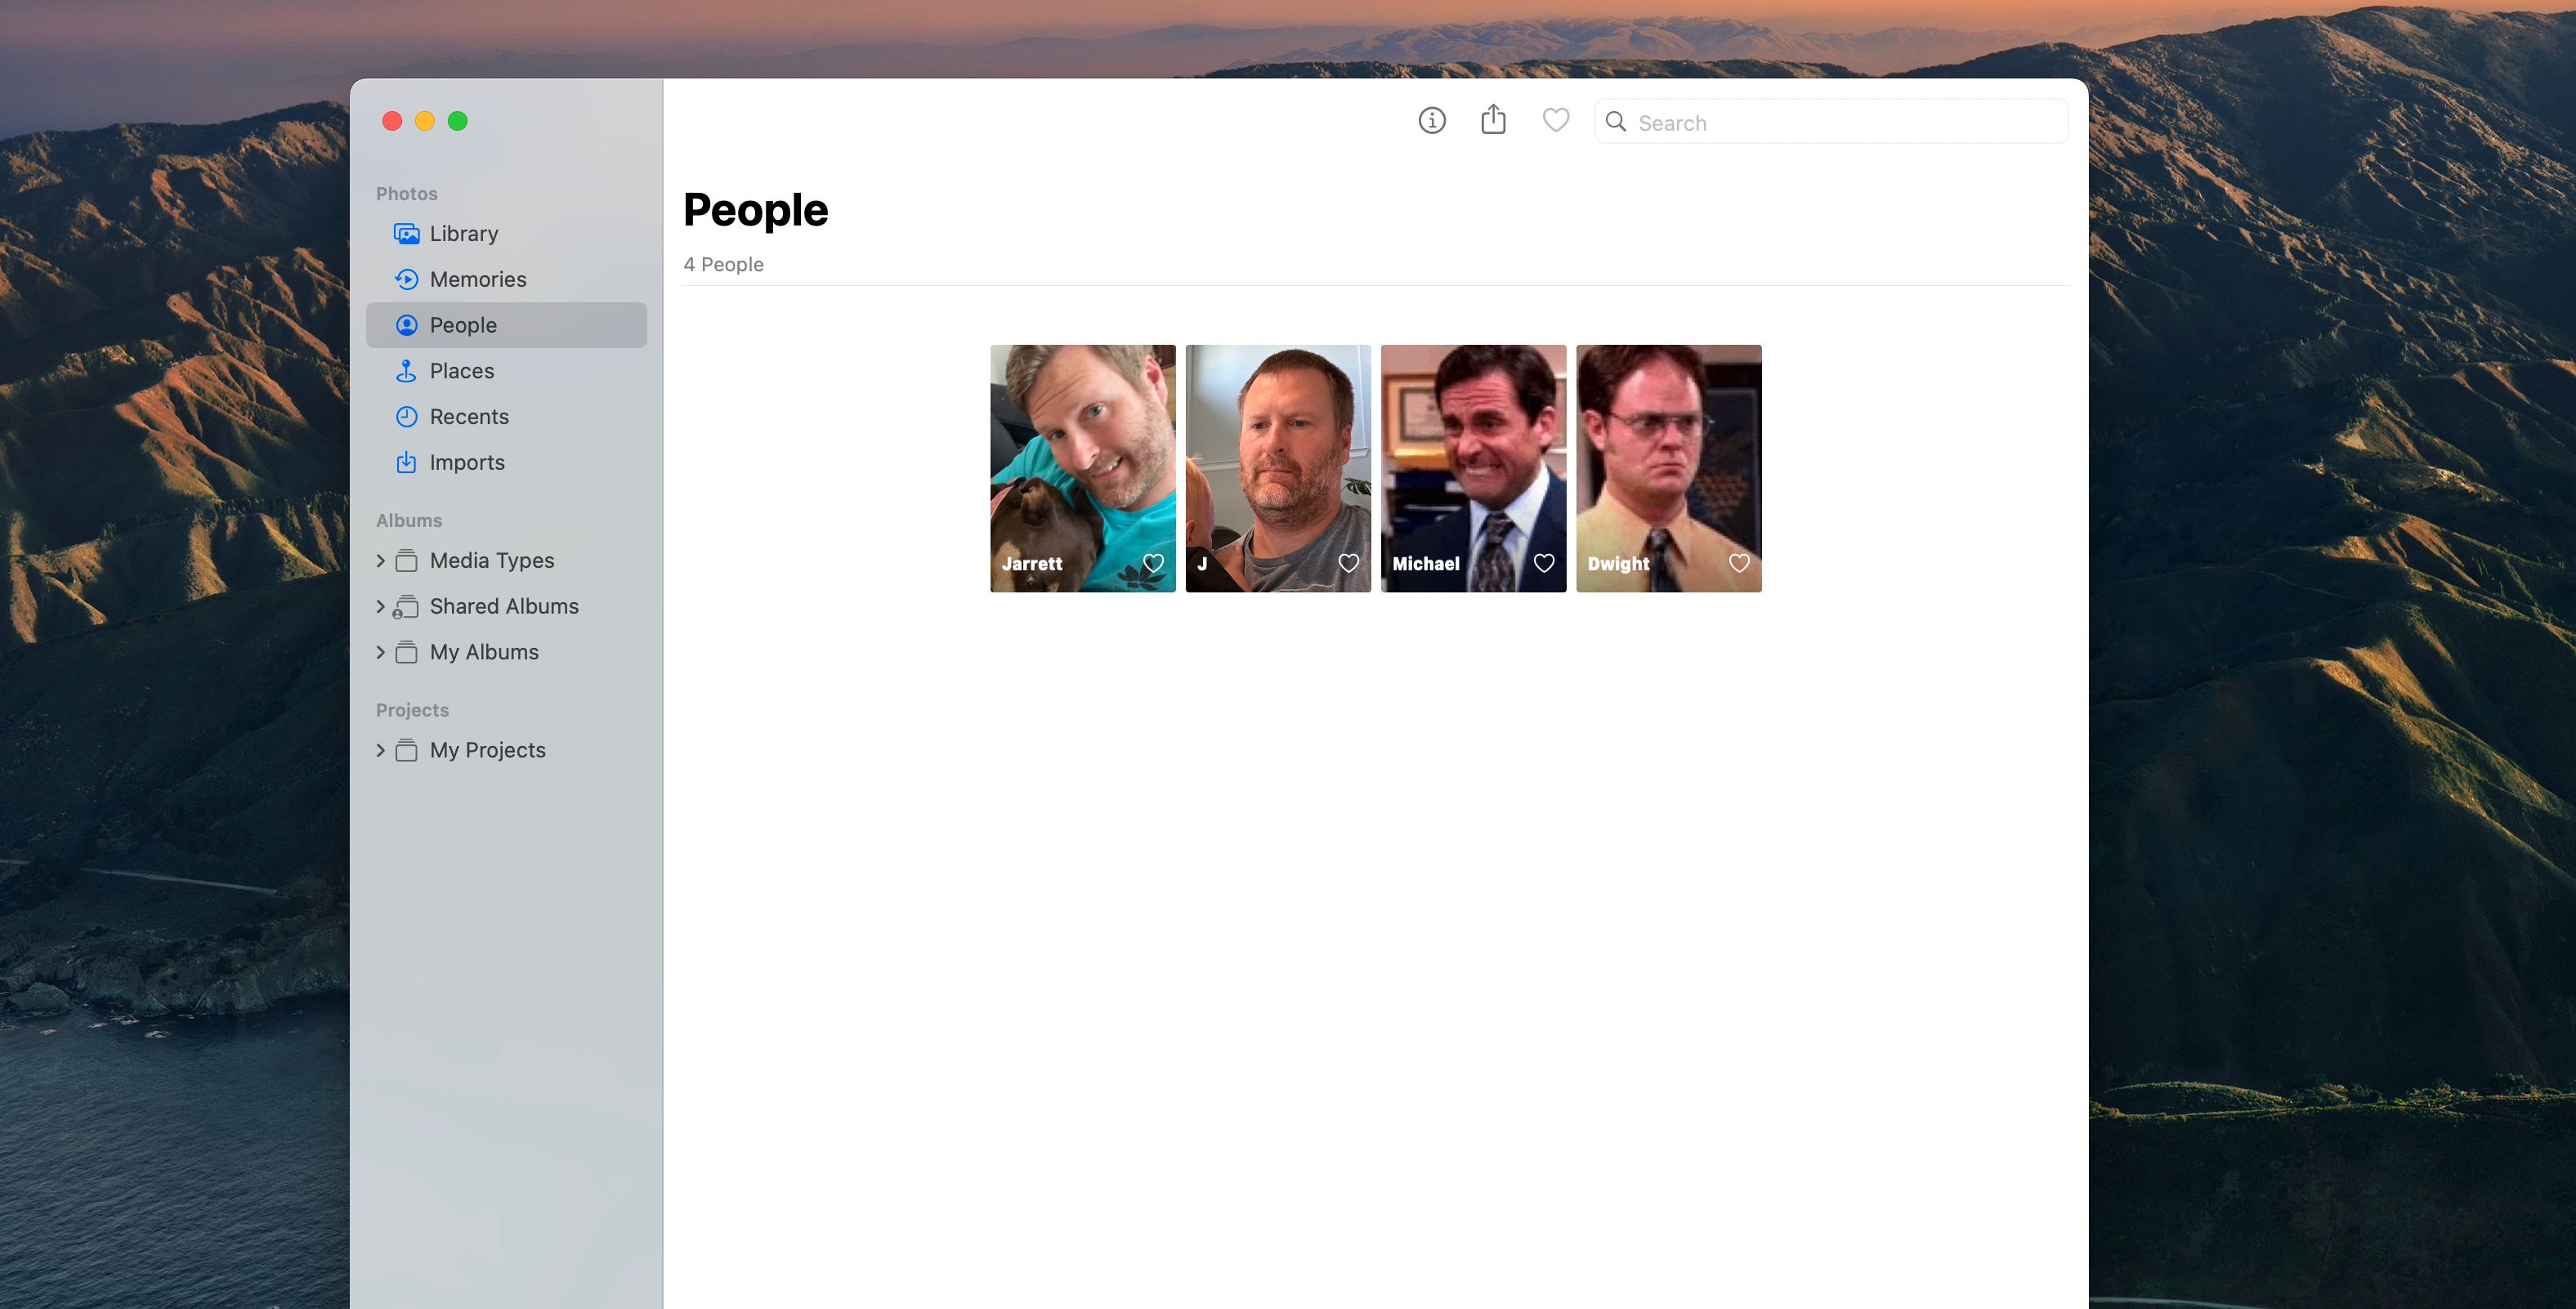
Cách Tìm Ảnh Được Gắn Nhãn trên Mac Chọn album People từ thanh bên của ứng dụng Photos để xem tất cả các khuôn mặt bạn đã gắn nhãn. Photos sẽ hiển thị tất cả các hình ảnh đã gắn nhãn ở đây và bất kỳ khuôn mặt nào đã được nhóm đang chờ gắn nhãn. Bạn cũng có thể tìm kiếm nhiều cấp độ bằng cách sử dụng thanh tìm kiếm ở phía trên cùng. Ví dụ, bạn có thể tìm kiếm một người nào được chụp ở một địa điểm cụ thể hoặc mặc áo sơ mi cụ thể. Điều này có thể giúp bạn nhanh chóng tìm thấy một bức ảnh cụ thể. Khi bạn đang ở trong album của một người đã được gắn nhãn, nếu bạn cuộn xuống phía dưới cùng, bạn sẽ thấy tùy chọn Xác Nhận Các Ảnh Bổ Sung của người đó. Nhấp vào đó để xem tất cả các bức ảnh mà Mac của bạn nghĩ là người đã được gắn nhãn cho bạn xác nhận hoặc từ chối. Tất nhiên, bạn cũng có thể sử dụng tìm kiếm Spotlight trên Mac của bạn để tìm kiếm những người bạn đã gắn nhãn. Tuy nhiên, nếu bạn đã di chuyển thư viện ảnh của mình vào một ổ đĩa ngoài, bạn sẽ không thể tìm kiếm bằng cách sử dụng Spotlight nữa.
Cách Chỉnh Sửa Khuôn Mặt Được Gắn Nhãn Trong album People trên Photos của Apple
Mặc dù iPhone và Mac của bạn dựa vào thuật toán học máy để tìm khuôn mặt của những người, nhưng đôi khi nó có thể nhận lầm
Nguồn: https://www.makeuseof.com/how-to-tag-faces-in-apple-photos/
Organizing your photos can be a headache. Once you add so many photos, things can become unwieldy, complicating the process of finding the right picture.
Luckily, the Photos app can detect faces in your photos, allowing you to tag and group pictures of people in your photos. Here’s how to tag people’s faces in Apple’s Photo App.
How to Tag Someone’s Face in the Photos App
Once you’ve added pictures to your photo library, your iPhone or Mac will scan them for faces. This is done on-device, so your privacy stays intact. This is one way your Mac protects your privacy. If you use iCloud Photos, these tags will even sync across all your Apple devices while preserving your privacy.
Tagging Faces in the Photos App on an iPhone or iPad
To tag someone in a photo on your iPhone, here’s what you need to do:
- Scroll to a photo that contains a person you’d like to tag.
- Press the Info (i) icon at the bottom or swipe up on the photo.
- If the Photos app has identified a face, you’ll see a little circle icon with the face in the lower-right corner of the image. A blue circle with a question mark inside means the face has not yet been tagged. Tap on it.
- Select Name This Person from the context menu.
- On the next screen, name them and hit Next.


Now, this person’s tagged photos will appear in your People album. Your iPhone will do its best to discover more pictures of this person and automatically tag them based on facial analysis.
Tagging Faces in the Photos App on a Mac
To tag someone’s face in the macOS version of the Photos app, follow these steps:
- Open a photo with a face you’d like to tag in Apple’s Photos app.
- Click the Info (i) button from the toolbar in the upper-right corner. An Info window will pop up with details about the photo. Any faces found in the photo will be listed below the keyword field.
- Double-click the face you’d like to tag.
- Now, you’ll see Add Name in the top-left corner.
You can also click View in the menu bar and select Show Face Names so that the next time you open a picture, all the faces will be circled. If you’ve already tagged faces, those faces will have names below them. Click the box below to the circled face to add or change a name.
If your Mac doesn’t recognize a face in a photo, you can open the Information pane and hit the plus (+) circle on it. A new circle will appear in the middle of the photo. You can drag this around the face you’d like and tag it.
How to Find Photos by Tagged Faces in Apple Photos
Now that you have a face or two tagged, finding photos of those faces will become much more manageable. Finding a particular picture of someone becomes a breeze.
Finding Tagged Photos on an iPhone or iPad
All the tagged faces are arranged in a photo album called People. You can find all the faces you have tagged and some that your device has identified for tagging. Select an album to see all the tagged photos of a particular person.
By default, Photos will show you a collage of images of that person, hiding some if they look similar. If you’d like to see all the photos of that person tagged so far, tap on Show More below the highlighted photo.
You can also look at other faces that your iPhone thinks might be the person tagged in the album. Tap the ellipsis (…) icon at the top-right corner and select Confirm Additional Photos. Your iPhone will show you photos that it thinks might be the person you’ve tagged. Confirm by tapping Yes or No.
Once you have tagged people in photos, they will also show up when you search for their names in the Photos app or Spotlight search on your iPhone.
Finding Tagged Photos on a Mac
Select the People album from the Photos app’s sidebar to view all your tagged faces. Photos will display all the tagged images here and any face grouped waiting for a tag.
You can also do a multi-level search using the search bar at the top. For example, you can search for someone taken at a particular location or wearing a specific shirt. This can expedite finding a particular picture.
Once you’re inside someone’s tagged album, if you scroll down all the way to the bottom, you’ll see the option to Confirm Additional Photos of that person. Click that to see all the photos your Mac thinks are the tagged person for you to confirm or deny.
Of course, you can also use Spotlight search on your Mac to find people you have tagged. However, if you’ve moved your photo library to an external drive, you won’t be able to search using Spotlight anymore.
How to Edit a Tagged Face From the People Album in Apple Photos
While your iPhone and Mac rely on machine learning algorithms to find people’s faces, it can get faces wrong sometimes. Unfortunately, it doesn’t always tag the correct person, or you might have misidentified a face. We’ll teach you how to fix the incorrect tag below.
Editing a Tagged Face in Photos on an iPhone or iPad
If you find an incorrectly tagged photo on your iPhone or iPad, you have two ways to correct it.
Find the photo and swipe up to reveal the tagged faces. Tap the small circle at the bottom-left corner of the image representing the tagged person. Then, choose This Is Not (Person’s Name) from the context menu.
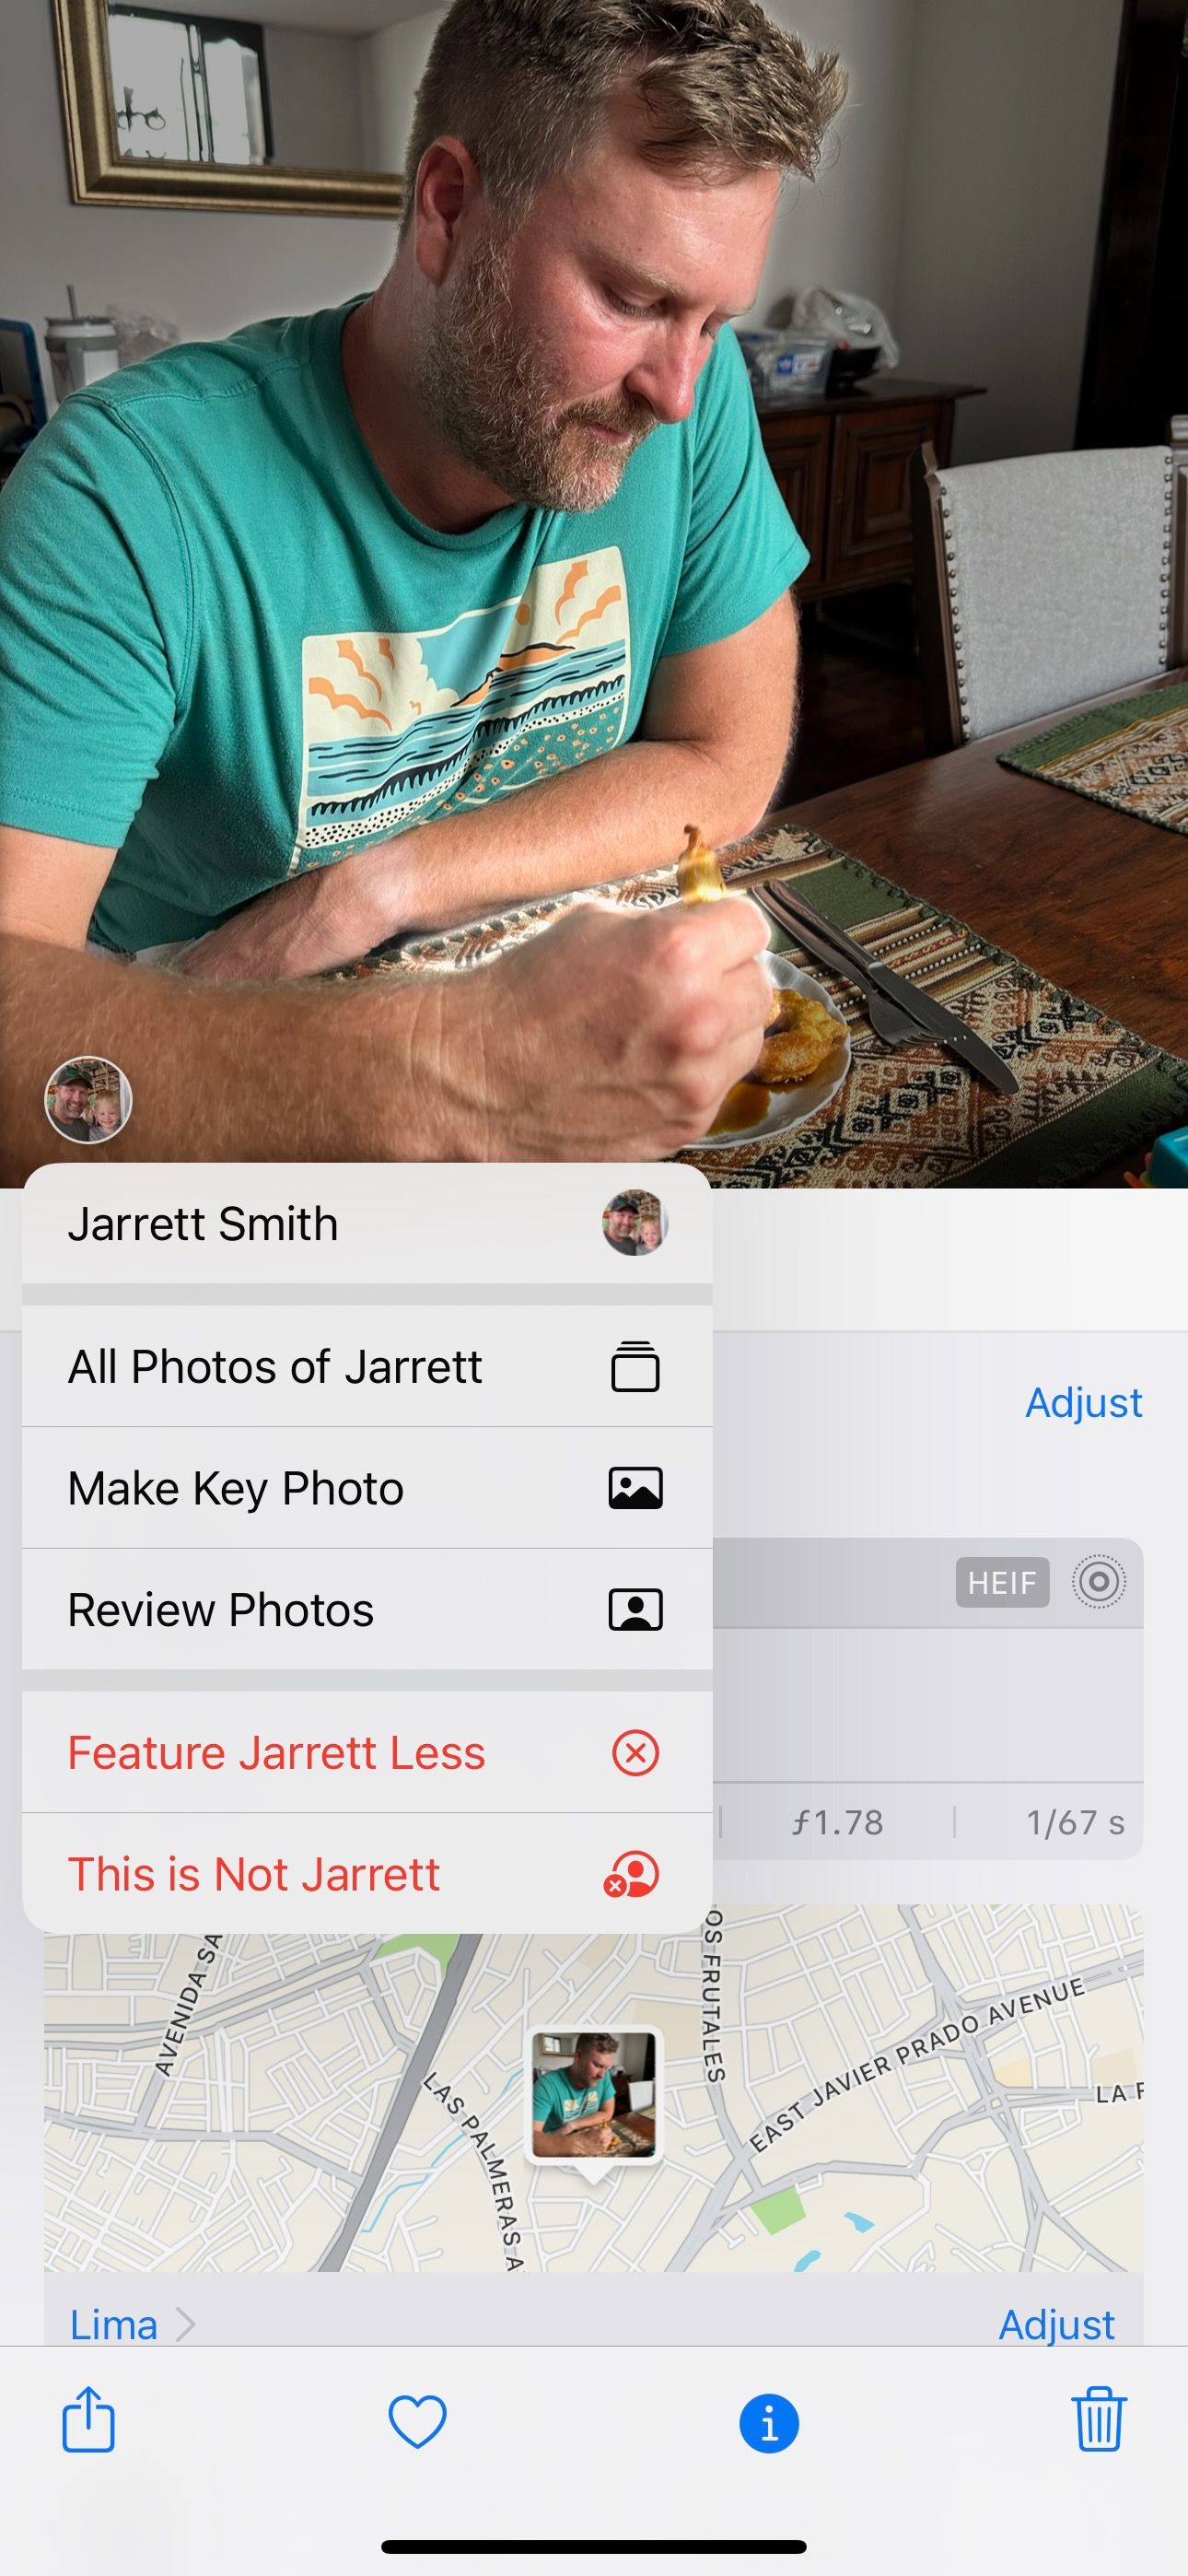
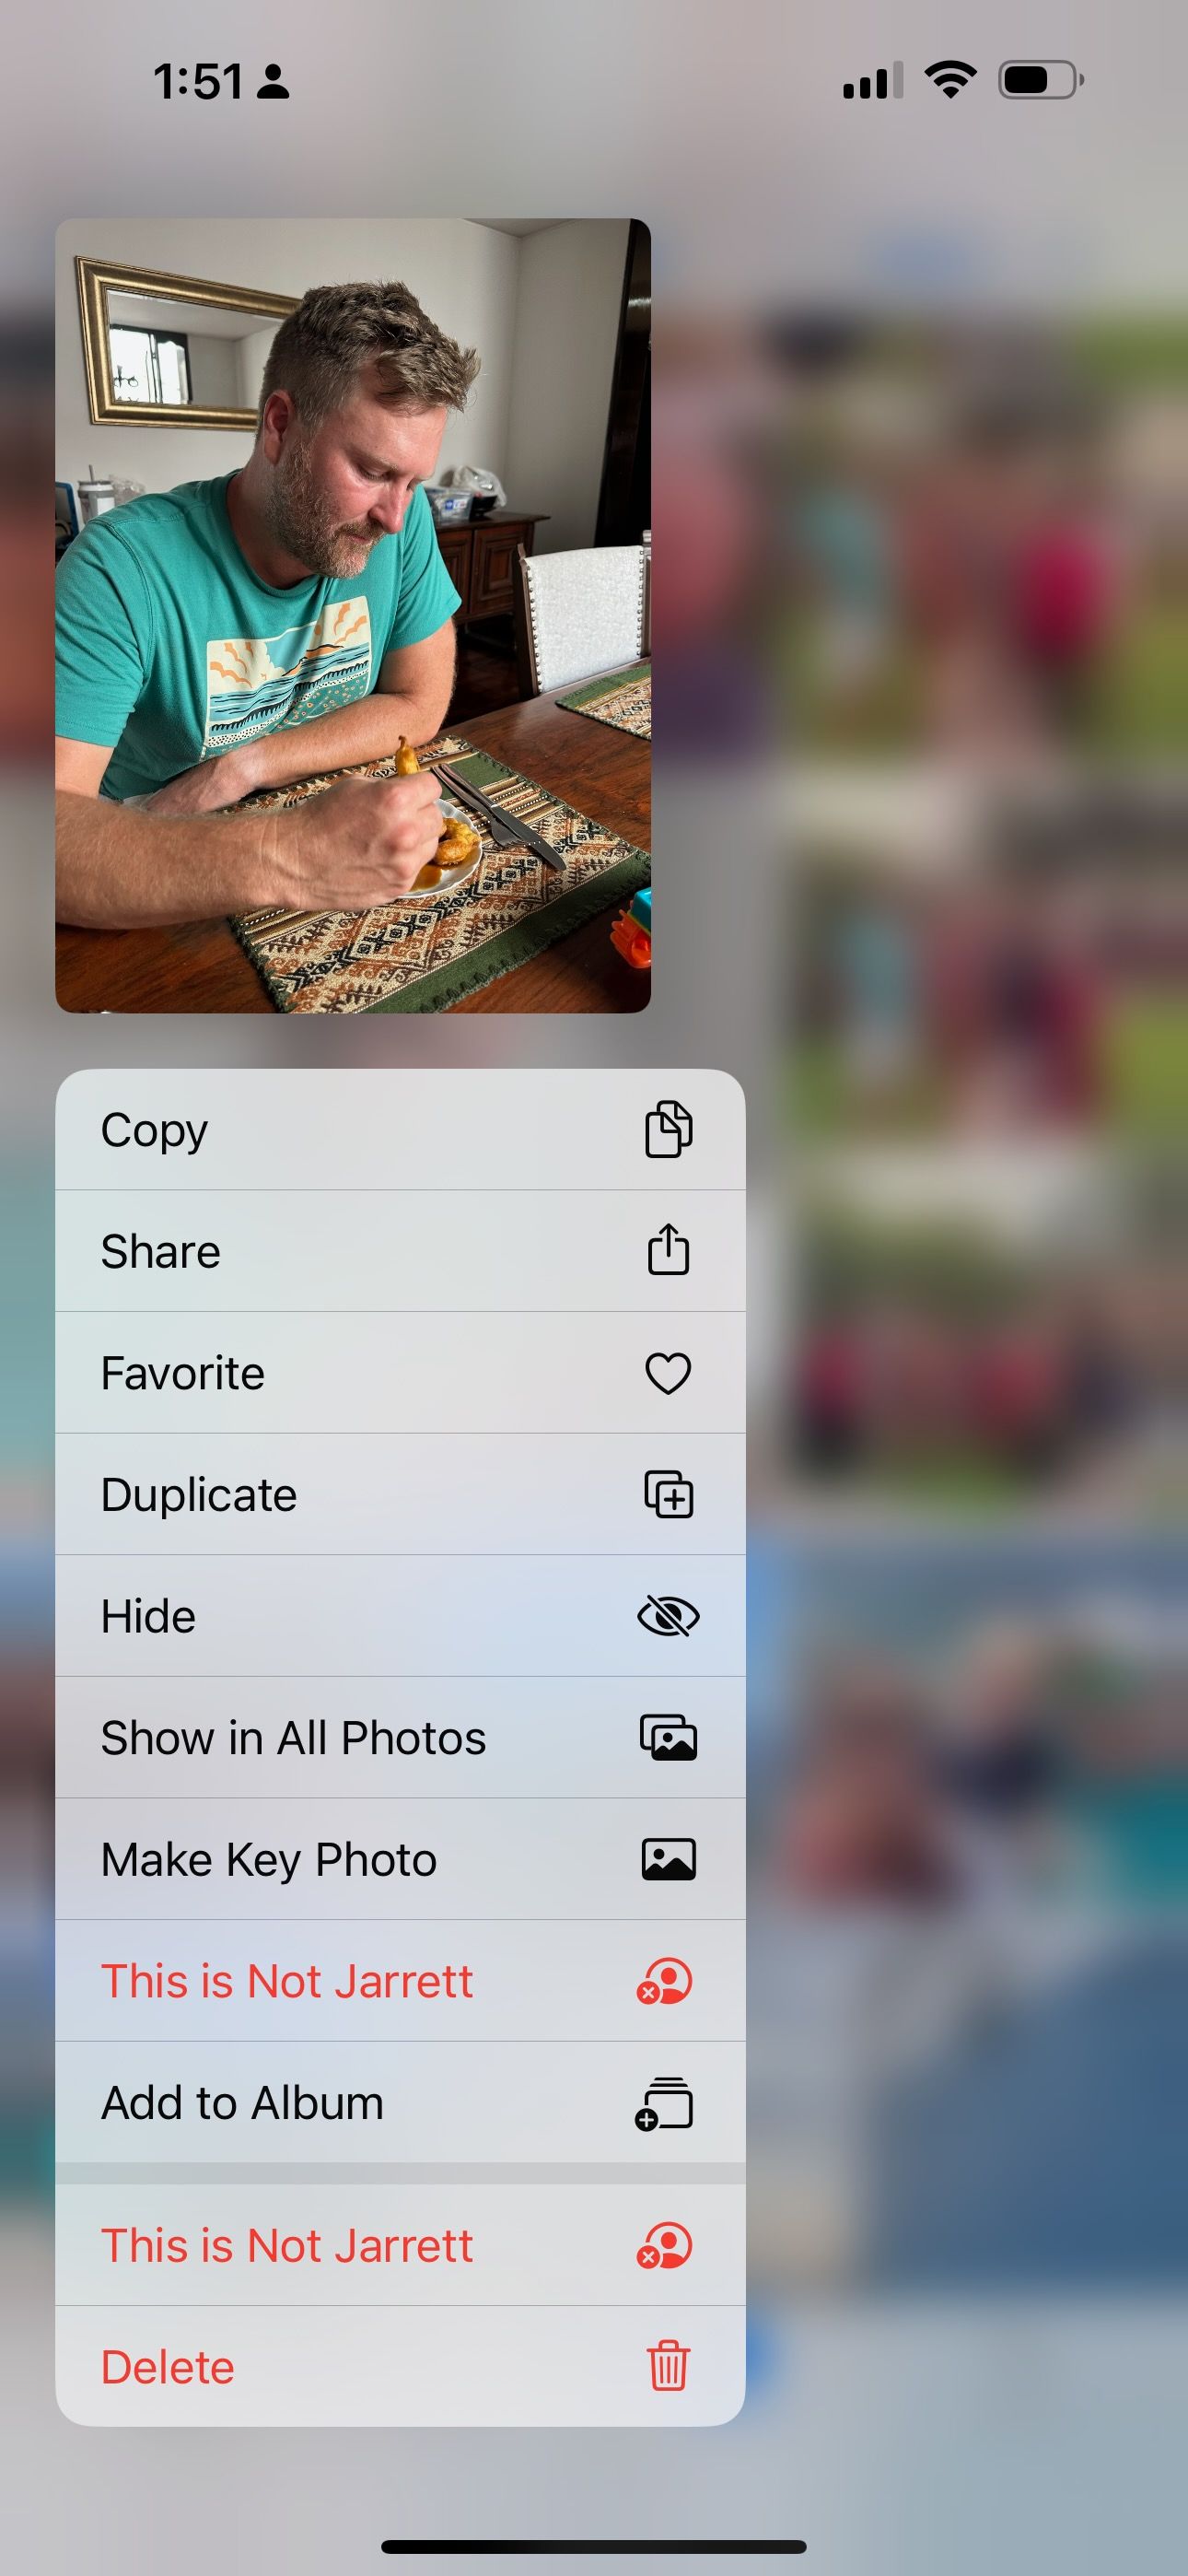
Alternatively, you can head to the People album and select the person incorrectly tagged. In the list of all their photos, find the one that has been incorrectly tagged. Then, long-press the photo in the list and select This is Not (Person’s Name).
Sometimes, your iPhone might find enough differences between photos of one person that it makes multiple albums. Luckily, they made it simple to combine these photos.
Go to the People album to combine two or more albums of the same person. Then, press the select button in the top right. Now, select the albums you’d like to combine and tap Merge at the bottom-right corner.
Editing a Tagged Face in Photos on a Mac
If someone has been incorrectly tagged on the Mac, you can head to their photo, click View > Show Face Names from the menu bar, and then type the correct name under their face.
You can also visit the People album and select the tagged person. Find the incorrectly tagged picture and Control-click it. From the context menu, select This Is Not (Person’s Name).
If your Mac shows two or more albums of the same person, you can combine them from the People album. Hold down the Command key and select all the albums of the same person. Control-click and choose Merge X People (X being the number of albums you selected).
Tag People to Find Photos Easily
Tagging your friends, colleagues, and family members in photos can give you an edge in photo management. With this, you’ll be able to find people’s photos quickly and efficiently. It’s one of the many ways to master the built-in Photos app on your Apple device.
[ad_2]


